. Android Developers Blog

Tuesday, 3 July 2012

Database in HTML5

Hello Guys,

Have you thinking of Creating | Inserting | Fetching of data in HTML5. If yes then this
Blog will helps you a lot.
Yesterday I worked on a phonegap Application where my need is to provide offline
Access to my mobile Apps. Its very Simple using HTML5 offline access to local
Database .

Here , I am sharing with a sample code:

1. Creating Database and Table in HTML5:
         This is, just a simple form. Of course, when you have a form, you want to capture the form submission somehow. In our case, we’ll use the new HTML5 local SQL database. We don’t need any servers or HTTP requests or anything except a compatible browser .
Here’s how we initialize the database:

Below can see that all we did here was add an openDatabase call and some SQL statements to create tables. These are just standard SQL statements (the reference SQL is from SQLite). 

<!DOCTYPE html> 
<html>  
  <head>
    <title>Offline Storage</title>
    <script src="http://www.google.com/jsapi"></script>
    <script>
      google.load("jquery", "1.4.1");
    </script>
    <script>
      var db = window.openDatabase("Student", "", "Previous Course", 1024*1000);
      $(document).ready(function() {
        db.transaction(function(tx) {
          tx.executeSql('CREATE TABLE IF NOT EXISTS Course(id INTEGER PRIMARY KEY, course_id
              INTEGER, subject_one TEXT, subject_two TEXT, email TEXT)', []);
        });
      });
    </script>
  </head>
  <body>
    <form method="get" id="course_form">
      <div>
        <label for="1">Subject 1</label>
        <input type="text" value="" id="subject1" name="subject1" placeholder="subject"/>
      </div>
      <div>
        <label for="2">Subject 2</label>
        <input type="text"  value="" id="subject2" name="subject2" placeholder="subject" />
      </div>
      <div>
        <input type="email" id="email" placeholder="Enter your email address" size="40"/>
      </div>
      <div>
        <input type="submit" value="Upload Data" />
      </div>
    </form>
  </body>
</html> 


2. Inserting Data into the Table:
               Now we’ll write a couple functions to help us insert subject into this table:

<!DOCTYPE html>
<html>
<head>
<title>OffLine Storage</title>
<script src="http://www.google.com/jsapi"></script>
<script>
      google.load("jquery", "1.4.1");
</script>
<script>
      var db = window.openDatabase("Student", "", "Previous Course", 1024*1000);

      function insertSubject(subject_one, subject_two, course_id, email) {
       db.transaction(function(tx) {
          tx.executeSql('INSERT INTO Course (course_id, subject_one, subject_two, email)
            VALUES (?, ?, ?, ?)', [course_id, subject_one, subject_two, email]);
       });
      }

      $(document).ready(function() {
        db.transaction(function(tx) {
          tx.executeSql('CREATE TABLE IF NOT EXISTS Course(id INTEGER PRIMARY KEY, course_id
           INTEGER, subject_one TEXT, subject_two TEXT, email TEXT)', []);
        });

        $('#course_form').submit(function() {
         course = { 1: $('#subject1').val(), 2: $('#subject2').val() };
          
          insertSubject($('#subject1').val(), $('#subject2').val(), 1, $('#email').val());

          return false;
        });
      });
    </script>
</head>
<body>
<form method="get" id="course_form">
<div>
<label for="1">Subject 1</label> <input type="text" value=""
id="subject1" name="subject1" placeholder="subject" />
</div>
<div>
<label for="2">Subject 2</label> <input type="text" value=""
id="subject2" name="subject2" placeholder="subject" />
</div>
<div>
<input type="email" id="email" placeholder="Enter your email address"
size="40" />
</div>
<div>
<input type="submit" value="Upload Data" />
</div>
</form>
</body>
</html>

3. Displaying | Fetching of data from the table :
       Getting data inserted into our database was trivial, but now we want to show previously submitted data, right? This is easy, too. We’ll start with two changes: (1) show ALL previously submitted data upon loading the page, and (2) update this list whenever new data are submitted.


<!DOCTYPE html>
<html>
<head>
<title>OffLine Storage</title>
<script src="http://www.google.com/jsapi"></script>
<script>
      google.load("jquery", "1.4.1");
</script>
<script>
      var db = window.openDatabase("Student", "", "Previous Course", 1024*1000);

      function insertSubject(subject_one, subject_two, course_id, email) {

       db.transaction(function(tx) {
          tx.executeSql('INSERT INTO Course (course_id, subject_one, subject_two, email)
VALUES (?, ?, ?, ?)', [course_id, subject_one, subject_two, email]);
       });
      }

      function renderResults(tx, rs) {
          e = $('#previous_course');
          e.html("");
          for(var i=0; i < rs.rows.length; i++) {
            r = rs.rows.item(i);
            e.html(e.html() + 'id: ' + r['id'] + ', subject_one: ' + r['subject_one'] + ',
  subject_two: ' + r['subject_two'] + ', email: ' + r['email'] + '<br />');
          }
        }
        function displayData(email) {
          db.transaction(function(tx) {
            if (!(email === undefined)) {
              tx.executeSql('SELECT * FROM Course WHERE email = ?', [email], renderResults);
            } else {
              tx.executeSql('SELECT * FROM Course', [], renderResults);
            }
          });
        }
        $(document).ready(function() {

         db.transaction(function(tx) {
                 tx.executeSql('CREATE TABLE IF NOT EXISTS Course(id INTEGER PRIMARY KEY,
course_id INTEGER, subject_one TEXT, subject_two TEXT, email TEXT)', []);
               });
               $('#course_form').submit(function() {
                course = { 1: $('#subject1').val(), 2: $('#subject2').val() };
                insertSubject($('#subject1').val(), $('#subject2').val(), 1, $('#email').val());
                displayData();
            return false;
          });
               displayData();
        });
    </script>
</head>
<body>
<form method="get" id="course_form">
<div>
<label for="1">Subject 1</label> <input type="text" value=""
id="subject1" name="subject1" placeholder="subject" />
</div>
<div>
<label for="2">Subject 2</label> <input type="text" value=""
id="subject2" name="subject2" placeholder="subject" />
</div>
<div>
<input type="email" id="email" placeholder="Enter your email address"
size="40" />
</div>
<div>
<input type="submit" value="Upload Data" />
</div>
</form>
<div>
<h2>Previous Course</h2>
</div>
<div id="previous_course"></div>
</body>
</html>

Hope this will helps some one.....
Enjoy Coding  :)

Wednesday, 20 June 2012

Integrating Zxing QR Code scanner Into your android Application | ZXing QR Reader | Android - Integrate ZXing QR code scanner


Hello Android Guys,

 Have you facing issue in Integrating QR Code scanner ?  

 Please follow this steps:

android qr code Step1 :Obtain the zxing source code
  Run this command from your terminal(for mac/linux os)
  svn checkout http://zxing.googlecode.com/svn/trunk/ 
  zxing-read-    only
  Also you can find the full source code at this url
  http://code.google.com/p/zxing/source/browse/trunk.               

 Step 2 : Build zxing core using Apache Ant
  You will need to build the core project into a jar file using apache ant
  (download from here http://ant.apache.org/ivy/download.cgi). 
  Using a shell or cmd prompt navigate to the root directory of 
  the downloaded zxing src and execute “ant -f core/build.xml”. 
  This will produce a file core/core.jar which
  we will use in the next step.   
  Download Core.jar from here

 Step 3: Build ZXing Android using Eclipse
  Create a New Android Project (File –> New –> Android Project).
  Set the project name to ZXing (or similar).
  Select the “Create project from existing source” radio button
  Click “Browse” and navigate to the android project that you downloaded from
  zxing  and click “OK” Select “Finish”

  The project will not currently build. We need to add the core.jar file (that we
  produced    in the previous step) into our project. Right-click on ZXing
  project –> properties –> Java Build Path –> Add External Jars –> Navigate to
  and select core.jar –> Open –> OK.

  Actually, while we’re here we should do one more very important thing!
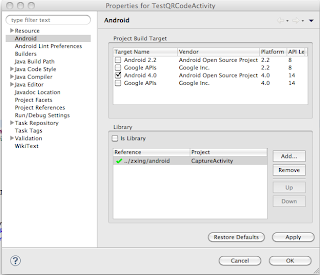
  Right-click on ZXing project –> properties –> Android –> Scroll down and
  check/tick the “Is Library” checkbox –> OK

 Step 4: Include ZXing Android into your project.
   Within Eclipse,  Right-click on YOURPROJECTNAMEHERE project –>
   properties –>Android –> Scroll down to Libraries section –> Click Add –>
   Select ZXing (which should appear as an option as a result of completing
   previous step).


   Here ,I am sharing you a full running Sample code . Just download it, import
   it into your Eclipse and Run.

   1. AndroidManifest.xml

 <?xml version="1.0" encoding="utf-8"?>
  <manifest xmlns:android="http://schemas.android.com/apk/res/android"
    package="com.testqrcode"
    android:versionCode="1"
    android:versionName="1.0" >

    <uses-sdk android:minSdkVersion="8" />
    <uses-permission android:name="android.permission.CAMERA" />

    <application
        android:icon="@drawable/ic_launcher"
        android:label="@string/app_name" >
        <activity
            android:name=".TestQRCodeActivity"
            android:label="@string/app_name" >
            <intent-filter>
              <action android:name="android.intent.action.MAIN" />

              <category android:name="android.intent.category.LAUNCHER" />
            </intent-filter>
        </activity>
        <activity
            android:name="com.google.zxing.client.android.CaptureActivity"
            android:configChanges="orientation|keyboardHidden"
            android:screenOrientation="landscape"
            android:theme="@android:style/Theme.NoTitleBar.Fullscreen"
            android:windowSoftInputMode="stateAlwaysHidden" >
            <intent-filter>
              <action android:name="android.intent.action.MAIN" />

              <category android:name="android.intent.category.DEFAULT" />
            </intent-filter>
            <intent-filter>
              <action android:name="com.google.zxing.client.android.SCAN" />

              <category android:name="android.intent.category.DEFAULT" />
            </intent-filter>
        </activity>
    </application>

  </manifest>
   2. TestQRCodeActivity.java
package com.testqrcode;

import com.google.zxing.client.android.CaptureActivity;
import android.app.Activity;
import android.content.Intent;
import android.os.Bundle;
import android.view.View;
import android.view.View.OnClickListener;
import android.widget.Button;
import android.widget.Toast;

public class TestQRCodeActivity extends Activity {

 /** Called when the activity is first created. */
 Button b1;
 @Override
 public void onCreate(Bundle savedInstanceState) {
  super.onCreate(savedInstanceState);

  setContentView(R.layout.main);
  b1 = (Button) findViewById(R.id.submit);

  b1.setOnClickListener(new OnClickListener() {
   public void onClick(View arg0) {
    // TODO Auto-generated method stub
    Intent intent = new Intent(TestQRCodeActivity.this,
            CaptureActivity.class);
    // Intent intent = new
    // Intent("com.google.zxing.client.android.SCAN");
    intent.putExtra("SCAN_MODE", "QR_CODE_MODE");
    startActivityForResult(intent, 0);
   }
  });
 }

 public void onActivityResult(int requestCode, int resultCode, Intent intent) {
  if (requestCode == 0) {
   if (resultCode == 1) {
    // Handle successful scan
    String capturedQrValue = intent.getStringExtra("RESULT");
    // String format =
    intent.getStringExtra("SCAN_RESULT_FORMAT");
          Toast.makeText(TestQRCodeActivity.this,
    "Scan Result:" + capturedQrValue, Toast.LENGTH_SHORT)
    .show();
   } else if (resultCode == RESULT_CANCELED) {
    // Handle cancel

   }
  } else {

  }
 }
}

 I am also sharing the screen shot which helps you in
        configuring the build path and zxing as a library  
         

 project.


android qr code reader integration
android qr code reader
qr code scanner
zxing qr code scanner
            
   
   May this will Helps you.
   Enjoy Coding…. J
   Cheers…. J

Tuesday, 12 June 2012

Android Section Header


Hello Droid Guy,

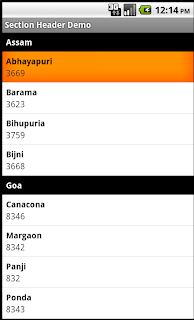
How to Create Section Header In Android.... ??

Here , I am Sharing the running code of Android Section Header.
Hope this will Helps anybody.... :)
Enjoy Coding  :)


1. ScreenShots:


android section header

android section heade


Code for Android Section Header   :

1. AndroidManifest.xml

 <?xml version="1.0" encoding="utf-8"?>
<manifest xmlns:android="http://schemas.android.com/apk/res/android" 
    package="com.mukesh.section.demo" 
    android:versionCode="1" 
    android:versionName="1.0">
    
    <uses-sdk android:minSdkVersion="8" />
     
<application android:icon="@drawable/icon" android:label="@string/app_name"     android:theme="@android:style/Theme.Light">
<activity android:name=".SectionDemoActivity">
<intent-filter>
<action android:name="android.intent.action.MAIN" />
<category android:name="android.intent.category.LAUNCHER" />
</intent-filter>
</activity>
</application>
</manifest>


2. SectionDemoActivity.java


package com.mukesh.section.demo;


import android.app.*;

import android.os.*;

import android.util.*;

import android.view.*;

import android.widget.*;


import java.util.*;


import com.mukesh.widget.*;


public class SectionDemoActivity extends Activity {

 AmazingListView lsComposer;

 SectionComposerAdapter adapter;


 @Override

 public void onCreate(Bundle savedInstanceState) {

  super.onCreate(savedInstanceState);

  setContentView(R.layout.activity_section_demo);


  lsComposer = (AmazingListView) findViewById(R.id.lsComposer);

  lsComposer.setPinnedHeaderView(LayoutInflater.from(this).inflate(

    R.layout.item_composer_header, lsComposer, false));

  lsComposer.setAdapter(adapter = new SectionComposerAdapter());

 }


 class SectionComposerAdapter extends AmazingAdapter {

  List<Pair<String, List<Composer>>> all = Data.getAllData();


  @Override

  public int getCount() {

   int res = 0;

   for (int i = 0; i < all.size(); i++) {

    res += all.get(i).second.size();

   }

   return res;

  }


  @Override

  public Composer getItem(int position) {

   int c = 0;

   for (int i = 0; i < all.size(); i++) {

    if (position >= c && position < c + all.get(i).second.size()) {

     return all.get(i).second.get(position - c);

    }

    c += all.get(i).second.size();

   }

   return null;

  }


  @Override

  public long getItemId(int position) {

   return position;

  }


  @Override

  protected void onNextPageRequested(int page) {

  }


  @Override

  protected void bindSectionHeader(View view, int position,

    boolean displaySectionHeader) {

   if (displaySectionHeader) {

    view.findViewById(R.id.header).setVisibility(View.VISIBLE);

    TextView lSectionTitle = (TextView) view

      .findViewById(R.id.header);

    lSectionTitle

      .setText(getSections()[getSectionForPosition(position)]);

   } else {

    view.findViewById(R.id.header).setVisibility(View.GONE);

   }

  }


  @Override

  public View getAmazingView(int position, View convertView,

    ViewGroup parent) {

   View res = convertView;

   if (res == null)

    res = getLayoutInflater().inflate(R.layout.item_composer, null);


   TextView lName = (TextView) res.findViewById(R.id.lName);

   TextView lYear = (TextView) res.findViewById(R.id.lYear);


   Composer composer = getItem(position);

   lName.setText(composer.name);

   lYear.setText(composer.code);


   return res;

  }


  @Override

  public void configurePinnedHeader(View header, int position, int alpha) {

   TextView lSectionHeader = (TextView) header;

   lSectionHeader

     .setText(getSections()[getSectionForPosition(position)]);

   lSectionHeader.setBackgroundColor(alpha << 24 | (0x000000));

   lSectionHeader.setTextColor(alpha << 24 | (0xffffff));

  }


  @Override

  public int getPositionForSection(int section) {

   if (section < 0)

    section = 0;

   if (section >= all.size())

    section = all.size() - 1;

   int c = 0;

   for (int i = 0; i < all.size(); i++) {

    if (section == i) {

     return c;

    }

    c += all.get(i).second.size();

   }

   return 0;

  }


  @Override

  public int getSectionForPosition(int position) {

   int c = 0;

   for (int i = 0; i < all.size(); i++) {

    if (position >= c && position < c + all.get(i).second.size()) {

     return i;

    }

    c += all.get(i).second.size();

   }

   return -1;

  }


  @Override

  public String[] getSections() {

   String[] res = new String[all.size()];

   for (int i = 0; i < all.size(); i++) {

    res[i] = all.get(i).first;

   }

   return res;

  }


 }

}

3. Data.java

package com.mukesh.section.demo;

import android.os.*;
import android.util.*;

import java.util.*;

public class Data {
 public static final String TAG = Data.class.getSimpleName();

 public static List<Pair<String, List<Composer>>> getAllData() {
  List<Pair<String, List<Composer>>> res = new ArrayList<Pair<String, List<Composer>>>();

  for (int i = 0; i < 4; i++) {
   res.add(getOneSection(i));
  }

  return res;
 }

 public static List<Composer> getFlattenedData() {
  List<Composer> res = new ArrayList<Composer>();

  for (int i = 0; i < 4; i++) {
   res.addAll(getOneSection(i).second);
  }

  return res;
 }

 public static Pair<Boolean, List<Composer>> getRows(int page) {
  List<Composer> flattenedData = getFlattenedData();
  if (page == 1) {
   return new Pair<Boolean, List<Composer>>(true,
     flattenedData.subList(0, 5));
  } else {
   SystemClock.sleep(2000); // simulate loading
   return new Pair<Boolean, List<Composer>>(
     page * 5 < flattenedData.size(), flattenedData.subList(
       (page - 1) * 5,
       Math.min(page * 5, flattenedData.size())));
  }
 }

 public static Pair<String, List<Composer>> getOneSection(int index) {
  String[] titles = { "Assam", "Goa", "Jharkhand", "Maharashtra",
    "Uttar Pradesh" };
  Composer[][] composerss = {
    { new Composer("Abhayapuri", "3669"),
      new Composer("Barama", "3623"),
      new Composer("Bihupuria", "3759"),
      new Composer("Bijni", "3668"), },
    { new Composer("Canacona", "8346"),
      new Composer("Margaon", "8342"),
      new Composer("Panji", "832"),
      new Composer("Ponda", "8343"), },
    { new Composer("Basia", "6533"),
      new Composer("Bokaro", "6542"),
      new Composer("Chaibasa", "6582"),
      new Composer("Chandil", "6591"), },
    { new Composer("Achalpur", "7223"),
      new Composer("Ahmednagar", "241"),
      new Composer("Ajara", "2323"),
      new Composer("Akola", "724"), },
    { new Composer("Agra", "562"),
      new Composer("Akbarpur", "5111"),
      new Composer("Aligarh", "571"),
      new Composer("Allahabad", "532"), }, };
  return new Pair<String, List<Composer>>(titles[index],
    Arrays.asList(composerss[index]));
 }
}

Download the full running source code:


Thursday, 7 June 2012

“NoClassDefFoundError” after updating ADT plugins 16 to ADT 17


 Hey Droid Guys,

 Yesterday, I  trapped in a really weird situation. My application is running
 fine on ADT plugins 16 but  after updating it to ADT  v17, the same 
 application gives me "NoClassDefFoundError".

 This will be quick post. Did you get "NoClassDefFoundError" after updating ADT
 plugins 16 to ADT plugins 17.


The solution  is:
  • If your jar libraries are in a lib folder, rename it to libs.
  • Remove all your jar libraries from the Build Path of your project. Don’t need to add them again to the Build Path.
  • In your libs folder, you should have just the jar libraries that your project is using. You can’t have different versions of a single library. This is because if you’ve noticed, Eclipse creates now a reference in the Build Path called “Android Dependecies” and he puts there all the jar files that are in your libs folder.
  • Follow steps 1, 2 and 3 for each Android Library Project that your project is using.
  • Make a project clean.
 Important: If you are still referencing jar libraries manually instead of putting them under libs/ be aware of      
      the following:         
  • If the project is a Library project, these jar libraries will not be automatically visible to application projects. You should really move these to libs/
  • If the project is an application, this can work but you must make sure to mark the jar files as exported.

no class definition found errorHere's how to mark Java project and jar libraries as exported (the Android Dependencies container does not have to be marked as exported, it is always exported anyway):

  
Hope it helps anybody! :D

Wednesday, 6 June 2012

Android Action Bar Demo


Hello Friends,

Today , I am going to explore a sample application in android ,which gives you
an idea , How to create Action Bar in Android.

Hope this will helps you.......
Enjoy Coding.. )


The Screen shot for these application is as below 

1. Home Screen:
android action bar

2. Information and Searh screen , on click of Search | Info  Icon:


action bar example


Code for Android Action Bar:

1. AndroidManifest.xml


<?xml version="1.0" encoding="utf-8"?>

<manifest xmlns:android="http://schemas.android.com/apk/res/android"
    package="com.mukesh.actionbar"
    android:versionCode="1"
    android:versionName="1.0" >

    <uses-sdk android:minSdkVersion="8" />

    <application
        android:icon="@drawable/icon"
        android:label="@string/app_name"
        android:theme="@style/Theme.D1" >
        <activity
            android:name=".HomeActivity"
            android:label="@string/app_name"
            android:theme="@style/Theme.D1" >
            <intent-filter>
                <action android:name="android.intent.action.MAIN" />

                <category android:name="android.intent.category.LAUNCHER" />
            </intent-filter>
        </activity>
        <activity
            android:name="com.mukesh.actionbar.SearchActivity"
            android:label="@string/title_search"
            android:theme="@style/Theme.D1" />
    </application>
</manifest>

2. HomeActivity.java


package com.mukesh.actionbar;


import android.os.Bundle;

public class HomeActivity extends ActionBarAppActivity
{
public void onCreate(Bundle savedInstanceState) 
    {
        super.onCreate(savedInstanceState);
        setContentView(R.layout.main);
    }
}


3.  SearchActivity.java


package com.mukesh.actionbar;


import android.os.Bundle;

public class SearchActivity extends ActionBarAppActivity
{
public  void onCreate(Bundle savedInstanceState) 
    {
        super.onCreate(savedInstanceState);
        setContentView(R.layout.search);
     }
}

4.ActioBarAppActivity.java


package com.mukesh.actionbar;


import android.app.Activity;

import android.content.Context;

import android.content.Intent;

import android.os.Bundle;

import android.view.View;

import android.widget.Toast;


public abstract class ActionBarAppActivity extends Activity 

{

    /** Called when the activity is first created. */

    @Override

    public void onCreate(Bundle savedInstanceState) 

    {

        super.onCreate(savedInstanceState);

        //setContentView(R.layout.main);

    }


    public void onAbout(View v)

    {

     Toast.makeText (getApplicationContext(),"This is a Sample App that displays use of Action Bar" , Toast.LENGTH_LONG).show ();

    }


    public void onSearch(View v)

    {

     startActivity (new Intent(getApplicationContext(), SearchActivity.class));

    }


    public void onHome (View v)

    {

     return2Home(this);

    }


    public void return2Home(Context context)

    {

        final Intent intent = new Intent(context, HomeActivity.class);

        intent.setFlags (Intent.FLAG_ACTIVITY_CLEAR_TOP);

        context.startActivity (intent);

    }

}


Download full Source code: ActionBar.zip

Tuesday, 5 June 2012

Android Alphabetical Indexer Demo |Android Alphabetindexer example


Hello Friends,

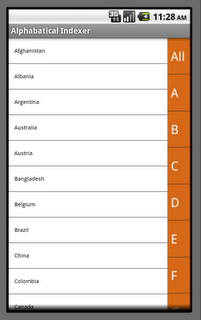
Today I am going to share a sample application in Android which have similar
functionality like Iphone Alphabatical Indexing.
I hope you will enjoy with this application . :)

These are the screen shot of this application:

1. Screen shot 1 : showing all places on clicking of all from the left menu

alphabaticalindexer


2. Screen shot 2: Index wise sorting, here i am showing all the item with Index "A" ,"B"
                             and "I"

alphabetical indexer android


alphabetical indexer

Here are sample code of this application:

1. AndroidManifest.xml


1:  <?xml version="1.0" encoding="utf-8"?>  
2:     <manifest xmlns:android="http://schemas.android.com/apk/res/android"  
3:    package="com.mukesh.aphabaticalview"  
4:    android:versionCode="1"  
5:    android:versionName="1.0" >  
6:    <uses-sdk android:minSdkVersion="8" />  
7:    <application  
8:      android:debuggable="true"  
9:      android:icon="@drawable/ic_launcher"  
10:      android:label="@string/app_name" >  
11:      <activity  
12:        android:name="com.mukesh.aphabaticalview.Alphbatical"  
13:        android:label="@string/app_name" >  
14:        <intent-filter>  
15:          <action android:name="android.intent.action.MAIN" />  
16:          <category android:name="android.intent.category.LAUNCHER" />  
17:        </intent-filter>  
18:      </activity>    
19:     </application>  
20:       </manifest>  


2. Alphabatical.java (Activity class)


1:  package com.mukesh.aphabaticalview;  
2:  import java.util.ArrayList;  
3:  import android.app.Activity;  
4:  import android.content.Intent;  
5:  import android.os.Bundle;  
6:  import android.view.View;  
7:  import android.widget.AdapterView;  
8:  import android.widget.ArrayAdapter;  
9:  import android.widget.ListView;  
10:  import android.widget.AdapterView.OnItemClickListener;  
11:  public class Alphbatical extends Activity {  
12:   private ListView countryList;  
13:   String item;  
14:   AllDataAdapter adapter;  
15:   int iconName;  
16:   ArrayList<Data> listData = new ArrayList<Data>();  
17:   ArrayList<Data> allPlaceData = new ArrayList<Data>();  
18:   ArrayList<Data> temp = new ArrayList<Data>();  
19:   @Override  
20:   public void onCreate(Bundle savedInstanceState) {  
21:   super.onCreate(savedInstanceState);  
22:   setContentView(R.layout.home);  
23:   final String[] alphabaticalList = { "All", "A", "B", "C", "D", "E",  
24:    "F", "G", "H", "I", "J", "K", "L", "M", "N", "O", "P", "Q",  
25:    "R", "S", "T", "U", "V", "W", "X", "Y", "Z" };  
26:   // side list  
27:   final ListView sideList = (ListView) findViewById(R.id.sideIndex);  
28:   ArrayAdapter<String> alphabaticalListAdapter = new ArrayAdapter<String>(  
29:    this, android.R.layout.simple_list_item_1, alphabaticalList);  
30:   sideList.setAdapter(alphabaticalListAdapter);  
31:   // fill hard coded in array list  
32:   allPlaceData.add(new Data("Afghanistan"));  
33:   allPlaceData.add(new Data("Albania"));  
34:   allPlaceData.add(new Data("Argentina"));  
35:   allPlaceData.add(new Data("Australia"));  
36:   allPlaceData.add(new Data("Austria"));  
37:   allPlaceData.add(new Data("Bangladesh"));  
38:   allPlaceData.add(new Data("Belgium"));  
39:   allPlaceData.add(new Data("Brazil"));  
40:   allPlaceData.add(new Data("China"));  
41:   allPlaceData.add(new Data("Colombia"));  
42:   allPlaceData.add(new Data("Canada"));  
43:   allPlaceData.add(new Data("Denmark"));  
44:   allPlaceData.add(new Data("Dominican"));  
45:   allPlaceData.add(new Data("Egypt"));  
46:   allPlaceData.add(new Data("Ethiopia"));  
47:   allPlaceData.add(new Data("Fiji"));  
48:   allPlaceData.add(new Data("France"));  
49:   allPlaceData.add(new Data("Georgia"));  
50:   allPlaceData.add(new Data("Germany"));  
51:   allPlaceData.add(new Data("Greece"));  
52:   allPlaceData.add(new Data("Hong Kong"));  
53:   allPlaceData.add(new Data("Hungary"));  
54:   allPlaceData.add(new Data("Iceland"));  
55:   allPlaceData.add(new Data("India"));  
56:   allPlaceData.add(new Data("Indonesia"));  
57:   allPlaceData.add(new Data("Iran"));  
58:   allPlaceData.add(new Data("Iraq"));  
59:   allPlaceData.add(new Data("Ireland"));  
60:   allPlaceData.add(new Data("Italy"));  
61:   allPlaceData.add(new Data("Jamaica"));  
62:   allPlaceData.add(new Data("Japan"));  
63:   allPlaceData.add(new Data("Kenya"));  
64:   allPlaceData.add(new Data("Korea, North"));  
65:   allPlaceData.add(new Data("Kuwait"));  
66:   allPlaceData.add(new Data("Lebanon"));  
67:   allPlaceData.add(new Data("Madagascar"));  
68:   allPlaceData.add(new Data("Malaysia"));  
69:   allPlaceData.add(new Data("Mexico"));  
70:   allPlaceData.add(new Data("Nepal"));  
71:   allPlaceData.add(new Data("New Zealand"));  
72:   allPlaceData.add(new Data("Oman"));  
73:   allPlaceData.add(new Data("Pakistan"));  
74:   allPlaceData.add(new Data("Poland"));  
75:   allPlaceData.add(new Data("Qatar"));  
76:   allPlaceData.add(new Data("Romania"));  
77:   allPlaceData.add(new Data("Russia"));  
78:   allPlaceData.add(new Data("Spain"));  
79:   allPlaceData.add(new Data("Sri Lanka"));  
80:   allPlaceData.add(new Data("Switzerland"));  
81:   allPlaceData.add(new Data("Taiwan"));  
82:   allPlaceData.add(new Data("Turkey"));  
83:   allPlaceData.add(new Data("Uganda"));  
84:   allPlaceData.add(new Data("United Kingdom"));  
85:   allPlaceData.add(new Data("Vietnam"));  
86:   allPlaceData.add(new Data("Yemen"));  
87:   allPlaceData.add(new Data("Zambia"));  
88:   allPlaceData.add(new Data("Zimbabwe"));  
89:   adapter = new AllDataAdapter(this, R.layout.home_list, allPlaceData);  
90:   countryList = (ListView) findViewById(R.id.list);  
91:   countryList.setAdapter(adapter);  
92:   temp.addAll(allPlaceData);  
93:   /*  
94:    * On Item click listener  
95:    */  
96:   countryList.setOnItemClickListener(new OnItemClickListener() {  
97:    public void onItemClick(AdapterView<?> parent, View v,  
98:     final int position, long id) {  
99:    // TODO Auto-generated method stub  
100:        // show toast  
101:    }  
102:   });  
103:   /*  
104:    * On click of alphabatical list view item  
105:    */  
106:   sideList.setOnItemClickListener(new OnItemClickListener() {  
107:    public void onItemClick(AdapterView<?> parent, View v,  
108:     int position, long id) {  
109:      item = (String) sideList.getAdapter().getItem(position);  
110:      listData.clear();  
111:      for (int i = 0; i < temp.size(); i++) {  
112:       String name = temp.get(i).title;  
113:       String subName = name.substring(0, 1);  
114:        if (subName.startsWith(item)) {  
115:            listData.add(new Data(name));  
116:         }  
117:     // for all click.........  
118:     if (position == 0) {  
119:     listData.add(new Data(name));  
120:     }  
121:    }  
122:    allPlaceData.clear();  
123:    allPlaceData.addAll(listData);  
124:    AllDataAdapter adapter = new AllDataAdapter(Alphbatical.this,  
125:    R.layout.home_list, allPlaceData);  
126:    countryList.setAdapter(adapter);  
127:    }  
128:   });  
129:   }  
130:  }  


AlphabaticalIndex.zip

Other Blogs Related to this:
   1. Horizontal Listview in android
   2. Custom ListView 
   3. Custom ListView with search


Copyright @ 2013 Android Developers Blog.