Roboelectric Setup with eclipse:
Hello Droid Guys, have you thinking of Test Driven Development
in Android using Roboelectric and Mockito??
Today , I am going explain some easy steps for configuring the test environment for your android project in eclipse. How to configure Robolectric test framework with eclipse.
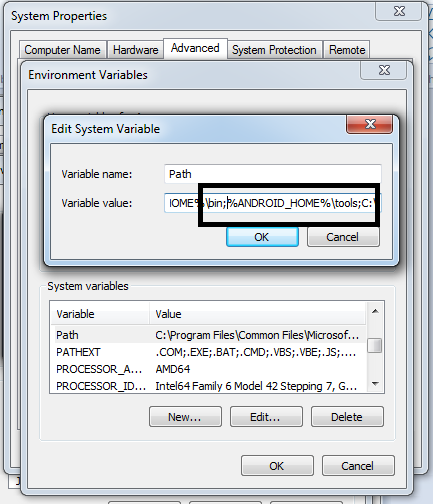
Note: Please add android sdk in your system envoirnment variable path
Step 1: Create an Android Project:
1. File-->New-->Project-->Android-->Android Project-->Next
2. New Android Project Dialog will open Name Your porject as
"RoboElectric"
3. Package Name "com.example"
4. Create an Activity Class "MainActivity"
5. Click Next and follow Instruction
Step 2: Adding a Source test directory in your android Project
1. Right click on "RoboElectric" android project in project explorer and create a new
Folder "test" and click Finish . See below snap for more help:
Step 3: Creating an Java test Project
1. File-->New-->Java Project
2. Name the Project as "RoboElectricTest" and click Next
3. Expand the RoboElectricTest and Seclect "src"
4. Click Remove source folder 'src' from build path. See below snap for
more help
5. Click on "Link additional source" and browse to "/Roboelectric/test" and then Click
Finish. See below snap for help
Step 4: Adding dependency on the Android Project
1. Right Click on "RoboelectricTest" Project-->Build Path -->Select Project Tab
2. Click Add-->select "Roboelectric" project Finish. See below snap:
Step 5: Configuring the build path of "RoboElectricTest" Project:
1.Go to project build path then select Library tab
2. Click Add Library-->select Junit--> Next
Note: Choose Junit 4 because RoboElectric is not Compatible with Junit3
3. Click Finish.
4. Click on "Add external Jar and Add roboelectric.jar. You can download it from
here.
5. Click on "Add external Jar and navigate to your android sdk folder and select android.jar
6. Click on "Add external Jar and navigate to your android sdk folder and select map.jar
Step 6: Now the final steps: i.e Creating eclipse Junit run configuration
Hello Droid Guys, have you thinking of Test Driven Development
in Android using Roboelectric and Mockito??
Today , I am going explain some easy steps for configuring the test environment for your android project in eclipse. How to configure Robolectric test framework with eclipse.
Note: Please add android sdk in your system envoirnment variable path
Step 1: Create an Android Project:
1. File-->New-->Project-->Android-->Android Project-->Next
2. New Android Project Dialog will open Name Your porject as
"RoboElectric"
3. Package Name "com.example"
4. Create an Activity Class "MainActivity"
5. Click Next and follow Instruction
Step 2: Adding a Source test directory in your android Project
1. Right click on "RoboElectric" android project in project explorer and create a new
Folder "test" and click Finish . See below snap for more help:
Step 3: Creating an Java test Project
1. File-->New-->Java Project
2. Name the Project as "RoboElectricTest" and click Next
3. Expand the RoboElectricTest and Seclect "src"
4. Click Remove source folder 'src' from build path. See below snap for
more help
5. Click on "Link additional source" and browse to "/Roboelectric/test" and then Click
Finish. See below snap for help
1. Right Click on "RoboelectricTest" Project-->Build Path -->Select Project Tab
2. Click Add-->select "Roboelectric" project Finish. See below snap:
Step 5: Configuring the build path of "RoboElectricTest" Project:
1.Go to project build path then select Library tab
2. Click Add Library-->select Junit--> Next
Note: Choose Junit 4 because RoboElectric is not Compatible with Junit3
3. Click Finish.
4. Click on "Add external Jar and Add roboelectric.jar. You can download it from
here.
5. Click on "Add external Jar and navigate to your android sdk folder and select android.jar
6. Click on "Add external Jar and navigate to your android sdk folder and select map.jar
Step 6: Now the final steps: i.e Creating eclipse Junit run configuration
1 1. Right Click on "RoboElectric" project go to "Run"-->"Run Configuration"
2. Double click on "Junit" from left menu (Not to click "Android Junit Test")
3. Name as RoboElectricTestConfiguration
4. Select the "Run all tests in the selected project,package or source folder option
5. Click search button
6. Select "RoboElectrictest"
9. Click the argument Tab from the top
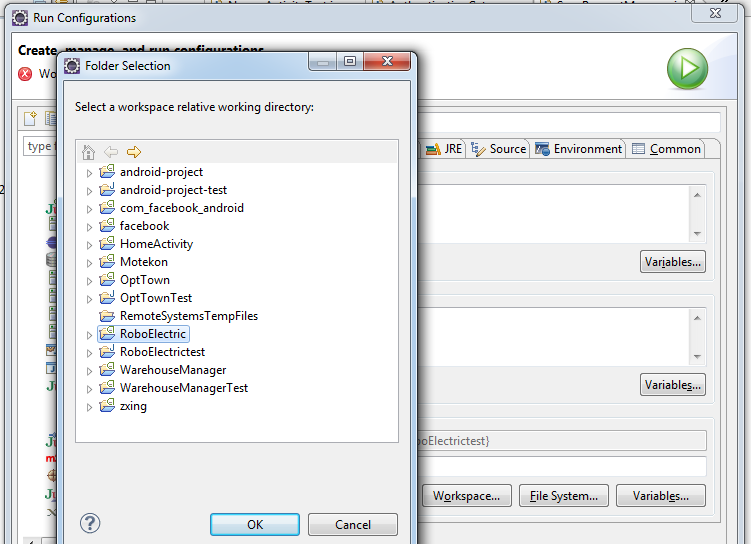
11. Click Worksapce, select "RoboElectric"(not the RoboelectricTest and the value inside
12. Click Ok and close.
The Roboelectric TDD environment is now configure. Now Android Unit Testing
Envoirnment With Robolectric will be Done
Envoirnment With Robolectric will be Done
In my next blog I will share with you a sample code , which test our first android project
Hello World , Using Roboelectric.
Enjoy Coding :)
You May ALSO LIKE THIS:
1. Android TextView testing
2. Android Button click testing
3. Android startActivity() or launch new activity test
Enjoy Coding :)
You May ALSO LIKE THIS:
1. Android TextView testing
2. Android Button click testing
3. Android startActivity() or launch new activity test


