. Android Developers Blog

Monday, 27 May 2013

Android Calendar Sync | Android Custom Calendar | Android Calendar event!Android Custom Calendar View

    Hello Friends,

   Have you Searching for Android calender syncing in your android app.Displaying
   all the events, birthday, reminder and meeting In your android app. Today I am sharing my
   another android tutorial for android custom calendar view and listing all the calendar
   event in my own android app. It is a small sample application for syncing of android
   calender events.


android calender
android calender


Calander syncing
android calander syncing


 1. CalendarView.java


package com.examples.android.calendar;

import java.text.DateFormat;
import java.text.SimpleDateFormat;
import java.util.ArrayList;
import java.util.GregorianCalendar;
import java.util.Locale;

import android.app.Activity;
import android.graphics.Color;
import android.os.Bundle;
import android.os.Handler;
import android.util.Log;
import android.view.View;
import android.view.View.OnClickListener;
import android.widget.AdapterView;
import android.widget.AdapterView.OnItemClickListener;
import android.widget.GridView;
import android.widget.LinearLayout;
import android.widget.RelativeLayout;
import android.widget.TextView;
import android.widget.Toast;

public class CalendarView extends Activity {

 public GregorianCalendar month, itemmonth;// calendar instances.

 public CalendarAdapter adapter;// adapter instance
 public Handler handler;// for grabbing some event values for showing the dot
       // marker.
 public ArrayList items; // container to store calendar items which
         // needs showing the event marker
 ArrayList event;
 LinearLayout rLayout;
 ArrayList date;
 ArrayList desc;

 public void onCreate(Bundle savedInstanceState) {
  super.onCreate(savedInstanceState);
  setContentView(R.layout.calendar);
  Locale.setDefault(Locale.US);

  rLayout = (LinearLayout) findViewById(R.id.text);
  month = (GregorianCalendar) GregorianCalendar.getInstance();
  itemmonth = (GregorianCalendar) month.clone();

  items = new ArrayList();

  adapter = new CalendarAdapter(this, month);

  GridView gridview = (GridView) findViewById(R.id.gridview);
  gridview.setAdapter(adapter);

  handler = new Handler();
  handler.post(calendarUpdater);

  TextView title = (TextView) findViewById(R.id.title);
  title.setText(android.text.format.DateFormat.format("MMMM yyyy", month));

  RelativeLayout previous = (RelativeLayout) findViewById(R.id.previous);

  previous.setOnClickListener(new OnClickListener() {

   @Override
   public void onClick(View v) {
    setPreviousMonth();
    refreshCalendar();
   }
  });

  RelativeLayout next = (RelativeLayout) findViewById(R.id.next);
  next.setOnClickListener(new OnClickListener() {

   @Override
   public void onClick(View v) {
    setNextMonth();
    refreshCalendar();

   }
  });

  gridview.setOnItemClickListener(new OnItemClickListener() {
   public void onItemClick(AdapterView parent, View v,
     int position, long id) {
    // removing the previous view if added
    if (((LinearLayout) rLayout).getChildCount() > 0) {
     ((LinearLayout) rLayout).removeAllViews();
    }
    desc = new ArrayList();
    date = new ArrayList();
    ((CalendarAdapter) parent.getAdapter()).setSelected(v);
    String selectedGridDate = CalendarAdapter.dayString
      .get(position);
    String[] separatedTime = selectedGridDate.split("-");
    String gridvalueString = separatedTime[2].replaceFirst("^0*",
      "");// taking last part of date. ie; 2 from 2012-12-02.
    int gridvalue = Integer.parseInt(gridvalueString);
    // navigate to next or previous month on clicking offdays.
    if ((gridvalue > 10) && (position < 8)) {
     setPreviousMonth();
     refreshCalendar();
    } else if ((gridvalue < 7) && (position > 28)) {
     setNextMonth();
     refreshCalendar();
    }
    ((CalendarAdapter) parent.getAdapter()).setSelected(v);

    for (int i = 0; i < Utility.startDates.size(); i++) {
     if (Utility.startDates.get(i).equals(selectedGridDate)) {
      desc.add(Utility.nameOfEvent.get(i));
     }
    }

    if (desc.size() > 0) {
     for (int i = 0; i < desc.size(); i++) {
      TextView rowTextView = new TextView(CalendarView.this);

      // set some properties of rowTextView or something
      rowTextView.setText("Event:" + desc.get(i));
      rowTextView.setTextColor(Color.BLACK);

      // add the textview to the linearlayout
      rLayout.addView(rowTextView);

     }

    }

    desc = null;

   }

  });
 }

 protected void setNextMonth() {
  if (month.get(GregorianCalendar.MONTH) == month
    .getActualMaximum(GregorianCalendar.MONTH)) {
   month.set((month.get(GregorianCalendar.YEAR) + 1),
     month.getActualMinimum(GregorianCalendar.MONTH), 1);
  } else {
   month.set(GregorianCalendar.MONTH,
     month.get(GregorianCalendar.MONTH) + 1);
  }

 }

 protected void setPreviousMonth() {
  if (month.get(GregorianCalendar.MONTH) == month
    .getActualMinimum(GregorianCalendar.MONTH)) {
   month.set((month.get(GregorianCalendar.YEAR) - 1),
     month.getActualMaximum(GregorianCalendar.MONTH), 1);
  } else {
   month.set(GregorianCalendar.MONTH,
     month.get(GregorianCalendar.MONTH) - 1);
  }

 }

 protected void showToast(String string) {
  Toast.makeText(this, string, Toast.LENGTH_SHORT).show();

 }

 public void refreshCalendar() {
  TextView title = (TextView) findViewById(R.id.title);

  adapter.refreshDays();
  adapter.notifyDataSetChanged();
  handler.post(calendarUpdater); // generate some calendar items

  title.setText(android.text.format.DateFormat.format("MMMM yyyy", month));
 }

 public Runnable calendarUpdater = new Runnable() {

  @Override
  public void run() {
   items.clear();

   // Print dates of the current week
   DateFormat df = new SimpleDateFormat("yyyy-MM-dd", Locale.US);
   String itemvalue;
   event = Utility.readCalendarEvent(CalendarView.this);
   Log.d("=====Event====", event.toString());
   Log.d("=====Date ARRAY====", Utility.startDates.toString());

   for (int i = 0; i < Utility.startDates.size(); i++) {
    itemvalue = df.format(itemmonth.getTime());
    itemmonth.add(GregorianCalendar.DATE, 1);
    items.add(Utility.startDates.get(i).toString());
   }
   adapter.setItems(items);
   adapter.notifyDataSetChanged();
  }
 };
}


2. CalendarAdapter.java
package com.examples.android.calendar;

import java.text.DateFormat;
import java.text.SimpleDateFormat;
import java.util.ArrayList;
import java.util.GregorianCalendar;
import java.util.List;
import java.util.Locale;

import android.content.Context;
import android.graphics.Color;
import android.view.LayoutInflater;
import android.view.View;
import android.view.ViewGroup;
import android.widget.BaseAdapter;
import android.widget.ImageView;
import android.widget.TextView;

public class CalendarAdapter extends BaseAdapter {
 private Context mContext;

 private java.util.Calendar month;
 public GregorianCalendar pmonth; // calendar instance for previous month
 /**
  * calendar instance for previous month for getting complete view
  */
 public GregorianCalendar pmonthmaxset;
 private GregorianCalendar selectedDate;
 int firstDay;
 int maxWeeknumber;
 int maxP;
 int calMaxP;
 int lastWeekDay;
 int leftDays;
 int mnthlength;
 String itemvalue, curentDateString;
 DateFormat df;

 private ArrayList items;
 public static List dayString;
 private View previousView;

 public CalendarAdapter(Context c, GregorianCalendar monthCalendar) {
  CalendarAdapter.dayString = new ArrayList();
  Locale.setDefault(Locale.US);
  month = monthCalendar;
  selectedDate = (GregorianCalendar) monthCalendar.clone();
  mContext = c;
  month.set(GregorianCalendar.DAY_OF_MONTH, 1);
  this.items = new ArrayList();
  df = new SimpleDateFormat("yyyy-MM-dd", Locale.US);
  curentDateString = df.format(selectedDate.getTime());
  refreshDays();
 }

 public void setItems(ArrayList items) {
  for (int i = 0; i != items.size(); i++) {
   if (items.get(i).length() == 1) {
    items.set(i, "0" + items.get(i));
   }
  }
  this.items = items;
 }

 public int getCount() {
  return dayString.size();
 }

 public Object getItem(int position) {
  return dayString.get(position);
 }

 public long getItemId(int position) {
  return 0;
 }

 // create a new view for each item referenced by the Adapter
 public View getView(int position, View convertView, ViewGroup parent) {
  View v = convertView;
  TextView dayView;
  if (convertView == null) { // if it's not recycled, initialize some
         // attributes
   LayoutInflater vi = (LayoutInflater) mContext
     .getSystemService(Context.LAYOUT_INFLATER_SERVICE);
   v = vi.inflate(R.layout.calendar_item, null);

  }
  dayView = (TextView) v.findViewById(R.id.date);
  // separates daystring into parts.
  String[] separatedTime = dayString.get(position).split("-");
  // taking last part of date. ie; 2 from 2012-12-02
  String gridvalue = separatedTime[2].replaceFirst("^0*", "");
  // checking whether the day is in current month or not.
  if ((Integer.parseInt(gridvalue) > 1) && (position < firstDay)) {
   // setting offdays to white color.
   dayView.setTextColor(Color.WHITE);
   dayView.setClickable(false);
   dayView.setFocusable(false);
  } else if ((Integer.parseInt(gridvalue) < 7) && (position > 28)) {
   dayView.setTextColor(Color.WHITE);
   dayView.setClickable(false);
   dayView.setFocusable(false);
  } else {
   // setting curent month's days in blue color.
   dayView.setTextColor(Color.BLUE);
  }

  if (dayString.get(position).equals(curentDateString)) {
   setSelected(v);
   previousView = v;
  } else {
   v.setBackgroundResource(R.drawable.list_item_background);
  }
  dayView.setText(gridvalue);

  // create date string for comparison
  String date = dayString.get(position);

  if (date.length() == 1) {
   date = "0" + date;
  }
  String monthStr = "" + (month.get(GregorianCalendar.MONTH) + 1);
  if (monthStr.length() == 1) {
   monthStr = "0" + monthStr;
  }

  // show icon if date is not empty and it exists in the items array
  ImageView iw = (ImageView) v.findViewById(R.id.date_icon);
  if (date.length() > 0 && items != null && items.contains(date)) {
   iw.setVisibility(View.VISIBLE);
  } else {
   iw.setVisibility(View.INVISIBLE);
  }
  return v;
 }

 public View setSelected(View view) {
  if (previousView != null) {
   previousView.setBackgroundResource(R.drawable.list_item_background);
  }
  previousView = view;
  view.setBackgroundResource(R.drawable.calendar_cel_selectl);
  return view;
 }

 public void refreshDays() {
  // clear items
  items.clear();
  dayString.clear();
  Locale.setDefault(Locale.US);
  pmonth = (GregorianCalendar) month.clone();
  // month start day. ie; sun, mon, etc
  firstDay = month.get(GregorianCalendar.DAY_OF_WEEK);
  // finding number of weeks in current month.
  maxWeeknumber = month.getActualMaximum(GregorianCalendar.WEEK_OF_MONTH);
  // allocating maximum row number for the gridview.
  mnthlength = maxWeeknumber * 7;
  maxP = getMaxP(); // previous month maximum day 31,30....
  calMaxP = maxP - (firstDay - 1);// calendar offday starting 24,25 ...
  /**
   * Calendar instance for getting a complete gridview including the three
   * month's (previous,current,next) dates.
   */
  pmonthmaxset = (GregorianCalendar) pmonth.clone();
  /**
   * setting the start date as previous month's required date.
   */
  pmonthmaxset.set(GregorianCalendar.DAY_OF_MONTH, calMaxP + 1);

  /**
   * filling calendar gridview.
   */
  for (int n = 0; n < mnthlength; n++) {

   itemvalue = df.format(pmonthmaxset.getTime());
   pmonthmaxset.add(GregorianCalendar.DATE, 1);
   dayString.add(itemvalue);

  }
 }

 private int getMaxP() {
  int maxP;
  if (month.get(GregorianCalendar.MONTH) == month
    .getActualMinimum(GregorianCalendar.MONTH)) {
   pmonth.set((month.get(GregorianCalendar.YEAR) - 1),
     month.getActualMaximum(GregorianCalendar.MONTH), 1);
  } else {
   pmonth.set(GregorianCalendar.MONTH,
     month.get(GregorianCalendar.MONTH) - 1);
  }
  maxP = pmonth.getActualMaximum(GregorianCalendar.DAY_OF_MONTH);

  return maxP;
 }

}


3. Utility.java


package com.examples.android.calendar;

import java.text.SimpleDateFormat;
import java.util.ArrayList;
import java.util.Calendar;

import android.content.Context;
import android.database.Cursor;
import android.net.Uri;

public class Utility {
 public static ArrayList nameOfEvent = new ArrayList();
 public static ArrayList startDates = new ArrayList();
 public static ArrayList endDates = new ArrayList();
 public static ArrayList descriptions = new ArrayList();

 public static ArrayList readCalendarEvent(Context context) {
  Cursor cursor = context.getContentResolver()
    .query(Uri.parse("content://com.android.calendar/events"),
      new String[] { "calendar_id", "title", "description",
        "dtstart", "dtend", "eventLocation" }, null,
      null, null);
  cursor.moveToFirst();
  // fetching calendars name
  String CNames[] = new String[cursor.getCount()];

  // fetching calendars id
  nameOfEvent.clear();
  startDates.clear();
  endDates.clear();
  descriptions.clear();
  for (int i = 0; i < CNames.length; i++) {

   nameOfEvent.add(cursor.getString(1));
   startDates.add(getDate(Long.parseLong(cursor.getString(3))));
   endDates.add(getDate(Long.parseLong(cursor.getString(4))));
   descriptions.add(cursor.getString(2));
   CNames[i] = cursor.getString(1);
   cursor.moveToNext();

  }
  return nameOfEvent;
 }

 public static String getDate(long milliSeconds) {
  SimpleDateFormat formatter = new SimpleDateFormat("yyyy-MM-dd");
  Calendar calendar = Calendar.getInstance();
  calendar.setTimeInMillis(milliSeconds);
  return formatter.format(calendar.getTime());
 }
}


   Download the complete Source code 
   Calenderview.zip

   Enjoy coding :)

Sunday, 19 May 2013

Linkedin Integration in android | Android Linkedin Api | Post on Linkedin | Android Linkedin Integration Tutorial|LinkedIn Integration in Android App


Hello Friends,

I am going to share the steps of LinkedIn Integration in android.

Steps for LinkedIn Integration :

     1. Go to developer site(https://www.linkedin.com/secure/developer) and create
         an APP.
         
linkedin key
linkedin


  2. Getting API key(Consumer Key)  and Secret key:
   
linkedin


  3. Add following code in Your app and don't forgot to replace the key
      from the config.java file.


1. LinkedInSampleActivity

package com.example.linkedin;

import java.io.IOException;
import java.io.UnsupportedEncodingException;
import java.util.EnumSet;

import oauth.signpost.OAuthConsumer;
import oauth.signpost.commonshttp.CommonsHttpOAuthConsumer;
import oauth.signpost.exception.OAuthCommunicationException;
import oauth.signpost.exception.OAuthExpectationFailedException;
import oauth.signpost.exception.OAuthMessageSignerException;

import org.apache.http.client.ClientProtocolException;
import org.apache.http.client.methods.HttpPost;
import org.apache.http.entity.StringEntity;
import org.apache.http.impl.client.DefaultHttpClient;

import android.annotation.SuppressLint;
import android.annotation.TargetApi;
import android.app.Activity;
import android.app.ProgressDialog;
import android.os.Build;
import android.os.Bundle;
import android.os.StrictMode;
import android.util.Log;
import android.view.View;
import android.view.View.OnClickListener;
import android.widget.Button;
import android.widget.EditText;
import android.widget.ImageView;
import android.widget.TextView;
import android.widget.Toast;

import com.example.linkedin.R;
import com.google.code.linkedinapi.client.LinkedInApiClient;
import com.google.code.linkedinapi.client.LinkedInApiClientFactory;
import com.google.code.linkedinapi.client.enumeration.ProfileField;
import com.google.code.linkedinapi.client.oauth.LinkedInAccessToken;
import com.google.code.linkedinapi.client.oauth.LinkedInOAuthService;
import com.google.code.linkedinapi.client.oauth.LinkedInOAuthServiceFactory;
import com.google.code.linkedinapi.client.oauth.LinkedInRequestToken;
import com.google.code.linkedinapi.schema.Person;
import com.mukesh.linkedin.LinkedinDialog.OnVerifyListener;
import com.squareup.picasso.Picasso;

/**
 * @author Mukesh Kumar Yadav
 */
public class LinkedInSampleActivity extends Activity {
 Button login;
 Button share;
 EditText et;
 TextView name,profile;
 ImageView photo;
 public static final String OAUTH_CALLBACK_HOST = "litestcalback";

 final LinkedInOAuthService oAuthService = LinkedInOAuthServiceFactory
            .getInstance().createLinkedInOAuthService(
                    Config.LINKEDIN_CONSUMER_KEY,Config.LINKEDIN_CONSUMER_SECRET);
 final LinkedInApiClientFactory factory = LinkedInApiClientFactory
   .newInstance(Config.LINKEDIN_CONSUMER_KEY,
     Config.LINKEDIN_CONSUMER_SECRET);
 LinkedInRequestToken liToken;
 LinkedInApiClient client;
 LinkedInAccessToken accessToken = null;

 @TargetApi(Build.VERSION_CODES.GINGERBREAD)
 @SuppressLint("NewApi")
 @Override
 public void onCreate(Bundle savedInstanceState) {
  super.onCreate(savedInstanceState);
  setContentView(R.layout.main);
  
  if( Build.VERSION.SDK_INT >= 9){
            StrictMode.ThreadPolicy policy = new StrictMode.ThreadPolicy.Builder().permitAll().build();
            StrictMode.setThreadPolicy(policy); 
  }
  share = (Button) findViewById(R.id.share);
  name = (TextView) findViewById(R.id.name);
  profile = (TextView) findViewById(R.id.profile);
  et = (EditText) findViewById(R.id.et_share);
  login = (Button) findViewById(R.id.login);
  photo = (ImageView) findViewById(R.id.photo);

  login.setOnClickListener(new OnClickListener() {
   public void onClick(View v) {
    linkedInLogin();
   }
  });

  // share on linkedin
  share.setOnClickListener(new OnClickListener() {

   public void onClick(View v) {
    String share = et.getText().toString();
    if (null != share && !share.equalsIgnoreCase("")) {
     OAuthConsumer consumer = new CommonsHttpOAuthConsumer(Config.LINKEDIN_CONSUMER_KEY, Config.LINKEDIN_CONSUMER_SECRET);
        consumer.setTokenWithSecret(accessToken.getToken(), accessToken.getTokenSecret());
     DefaultHttpClient httpclient = new DefaultHttpClient();
     HttpPost post = new HttpPost("https://api.linkedin.com/v1/people/~/shares");
     try {
      consumer.sign(post);
     } catch (OAuthMessageSignerException e) {
      // TODO Auto-generated catch block
      e.printStackTrace();
     } catch (OAuthExpectationFailedException e) {
      // TODO Auto-generated catch block
      e.printStackTrace();
     } catch (OAuthCommunicationException e) {
      // TODO Auto-generated catch block
      e.printStackTrace();
     } // here need the consumer for sign in for post the share
     post.setHeader("content-type", "text/XML");
     String myEntity = "<share><comment>"+ share +"</comment><visibility><code>anyone</code></visibility></share>";
     try {
      post.setEntity(new StringEntity(myEntity));
      org.apache.http.HttpResponse response = httpclient.execute(post);
      Toast.makeText(LinkedInSampleActivity.this,
        "Shared sucessfully", Toast.LENGTH_SHORT).show();
     } catch (UnsupportedEncodingException e) {
      // TODO Auto-generated catch block
      e.printStackTrace();
     } catch (ClientProtocolException e) {
      // TODO Auto-generated catch block
      e.printStackTrace();
     } catch (IOException e) {
      // TODO Auto-generated catch block
      e.printStackTrace();
     }
    }else {
     Toast.makeText(LinkedInSampleActivity.this,
       "Please enter the text to share",
       Toast.LENGTH_SHORT).show();
    }
    
    /*String share = et.getText().toString();
    if (null != share && !share.equalsIgnoreCase("")) {
     client = factory.createLinkedInApiClient(accessToken);
     client.postNetworkUpdate(share);
     et.setText("");
     Toast.makeText(LinkedInSampleActivity.this,
       "Shared sucessfully", Toast.LENGTH_SHORT).show();
    } else {
     Toast.makeText(LinkedInSampleActivity.this,
       "Please enter the text to share",
       Toast.LENGTH_SHORT).show();
    }*/
   }
  });
 }

 private void linkedInLogin() {
  ProgressDialog progressDialog = new ProgressDialog(
    LinkedInSampleActivity.this);

  LinkedinDialog d = new LinkedinDialog(LinkedInSampleActivity.this,
    progressDialog);
  d.show();

  // set call back listener to get oauth_verifier value
  d.setVerifierListener(new OnVerifyListener() {
   @SuppressLint("NewApi")
   public void onVerify(String verifier) {
    try {
     Log.i("LinkedinSample", "verifier: " + verifier);

     accessToken = LinkedinDialog.oAuthService
       .getOAuthAccessToken(LinkedinDialog.liToken,
         verifier);
     LinkedinDialog.factory.createLinkedInApiClient(accessToken);
     client = factory.createLinkedInApiClient(accessToken);
     // client.postNetworkUpdate("Testing by Mukesh!!! LinkedIn wall post from Android app");
     Log.i("LinkedinSample",
       "ln_access_token: " + accessToken.getToken());
     Log.i("LinkedinSample",
       "ln_access_token: " + accessToken.getTokenSecret());
     //Person p = client.getProfileForCurrentUser();
     Person p =  client.getProfileForCurrentUser(EnumSet.of(
       ProfileField.ID, ProfileField.FIRST_NAME,
       ProfileField.PHONE_NUMBERS, ProfileField.LAST_NAME,
       ProfileField.HEADLINE, ProfileField.INDUSTRY,
       ProfileField.PICTURE_URL, ProfileField.DATE_OF_BIRTH,
       ProfileField.LOCATION_NAME, ProfileField.MAIN_ADDRESS,
        ProfileField.LOCATION_COUNTRY));
     Log.e("create access token secret", client.getAccessToken()
       .getTokenSecret());

     if(p!=null) {
      name.setText("Welcome " + p.getFirstName() + " "
        + p.getLastName());
      name.setVisibility(0);
      profile.setText("Profile:"+p.getHeadline());
      profile.setVisibility(0);
      String id = p.getId();
      String url = p.getPictureUrl();
      if(url != null && !url.isEmpty()) {
       Picasso.with(LinkedInSampleActivity.this).load(url).into(photo);
       photo.setVisibility(0);
      }
      login.setVisibility(4);
      share.setVisibility(0);
      et.setVisibility(0);
     }

    } catch (Exception e) {
     Log.i("LinkedinSample", "error to get verifier");
     e.printStackTrace();
    }
   }
  });

  // set progress dialog
  progressDialog.setMessage("Loading...");
  progressDialog.setCancelable(true);
  progressDialog.show();
 }
}

2.LinkedinDialog:
package com.example.linkedin;

import java.util.ArrayList;
import java.util.List;

import android.app.Dialog;
import android.app.ProgressDialog;
import android.content.Context;
import android.graphics.Picture;
import android.net.Uri;
import android.os.Bundle;
import android.util.Log;
import android.view.Window;
import android.webkit.WebView;
import android.webkit.WebView.PictureListener;
import android.webkit.WebViewClient;

import com.google.code.linkedinapi.client.LinkedInApiClientFactory;
import com.google.code.linkedinapi.client.oauth.LinkedInOAuthService;
import com.google.code.linkedinapi.client.oauth.LinkedInOAuthServiceFactory;
import com.google.code.linkedinapi.client.oauth.LinkedInRequestToken;

/**
 * Linkedin dialog
 * 
 * @author Mukesh Kumar Yadav
 */
public class LinkedinDialog extends Dialog {
 private ProgressDialog progressDialog = null;

 public static LinkedInApiClientFactory factory;
 public static LinkedInOAuthService oAuthService;
 public static LinkedInRequestToken liToken;

 /**
  * Construct a new LinkedIn dialog
  * 
  * @param context
  *            activity {@link Context}
  * @param progressDialog
  *            {@link ProgressDialog}
  */
 public LinkedinDialog(Context context, ProgressDialog progressDialog) {
  super(context);
  this.progressDialog = progressDialog;
 }

 @Override
 protected void onCreate(Bundle savedInstanceState) {
  requestWindowFeature(Window.FEATURE_NO_TITLE);// must call before super.
  super.onCreate(savedInstanceState);
  setContentView(R.layout.ln_dialog);

  setWebView();
 }

 /**
  * set webview.
  */
 private void setWebView() {
  LinkedinDialog.oAuthService = LinkedInOAuthServiceFactory.getInstance()
    .createLinkedInOAuthService(Config.LINKEDIN_CONSUMER_KEY,
      Config.LINKEDIN_CONSUMER_SECRET);
  LinkedinDialog.factory = LinkedInApiClientFactory.newInstance(
    Config.LINKEDIN_CONSUMER_KEY, Config.LINKEDIN_CONSUMER_SECRET);

  LinkedinDialog.liToken = LinkedinDialog.oAuthService
    .getOAuthRequestToken(Config.OAUTH_CALLBACK_URL);

  WebView mWebView = (WebView) findViewById(R.id.webkitWebView1);
  mWebView.getSettings().setJavaScriptEnabled(true);

  Log.i("LinkedinSample", LinkedinDialog.liToken.getAuthorizationUrl());
  mWebView.loadUrl(LinkedinDialog.liToken.getAuthorizationUrl());
  mWebView.setWebViewClient(new HelloWebViewClient());

  mWebView.setPictureListener(new PictureListener() {
   @Override
   public void onNewPicture(WebView view, Picture picture) {
    if (progressDialog != null && progressDialog.isShowing()) {
     progressDialog.dismiss();
    }

   }
  });

 }

 /**
  * webview client for internal url loading
  */
 class HelloWebViewClient extends WebViewClient {
  @Override
  public boolean shouldOverrideUrlLoading(WebView view, String url) {
   if (url.contains(Config.OAUTH_CALLBACK_URL)) {
    Uri uri = Uri.parse(url);
    String verifier = uri.getQueryParameter("oauth_verifier");

    cancel();

    for (OnVerifyListener d : listeners) {
     // call listener method
     d.onVerify(verifier);
    }
   } else if (url
     .contains("https://www.linkedin.com/uas/oauth/mukeshyadav4u.blogspot.in")) {
    cancel();
   } else {
    Log.i("LinkedinSample", "url: " + url);
    view.loadUrl(url);
   }

   return true;
  }
 }

 /**
  * List of listener.
  */
 private List listeners = new ArrayList();

 /**
  * Register a callback to be invoked when authentication have finished.
  * 
  * @param data
  *            The callback that will run
  */
 public void setVerifierListener(OnVerifyListener data) {
  listeners.add(data);
 }

 /**
  * Listener for oauth_verifier.
  */
 interface OnVerifyListener {
  /**
   * invoked when authentication have finished.
   * 
   * @param verifier
   *            oauth_verifier code.
   */
  public void onVerify(String verifier);
 }
}
3: Config.java
package com.example.linkedin;

public class Config {

 public static String LINKEDIN_CONSUMER_KEY = "your consumer key here";
 public static String LINKEDIN_CONSUMER_SECRET = "your consumer secret here
";


public static String scopeParams = "rw_nus+r_basicprofile";
 
public static String OAUTH_CALLBACK_SCHEME = "x-oauthflow-linkedin";
public static String OAUTH_CALLBACK_HOST = "callback";
public static String OAUTH_CALLBACK_URL = OAUTH_CALLBACK_SCHEME + "://" + OAUTH_CALLBACK_HOST;
}

4. main.xml

<?xml version="1.0" encoding="utf-8"?>

<RelativeLayout
xmlns:android="http://schemas.android.com/apk/res/android"
    android:layout_width="fill_parent"
    android:layout_height="fill_parent"
    android:background="@drawable/blue_bg_rect"
    android:orientation="vertical" >
    <RelativeLayout
        android:id="@+id/header"
       
android:layout_width="fill_parent"
       
  android:layout_height="wrap_content"
       
  android:background="@drawable/blue_gradient_header"
        android:orientation="horizontal"
  >
        <Button
           
  android:id="@+id/logo"
           
  android:layout_width="wrap_content"
           
  android:layout_height="wrap_content"
           
  android:layout_centerHorizontal="false"
           
  android:layout_centerVertical="true"

           
  android:layout_gravity="center"
           
  android:layout_marginLeft="8dp"

           
  android:background="@drawable/logo"

           
  android:padding="4dp"
            android:text=""
  />
        <TextView
           
  android:id="@+id/txtTitle"
           
  android:layout_width="wrap_content"

           
  android:layout_height="32dp"
           
  android:layout_centerHorizontal="true"
           
  android:layout_centerVertical="true"
           
  android:text="Linkedin"
           
  android:textColor="@android:color/white"
           
  android:textSize="22sp"
           
  android:textStyle="bold"
            android:typeface="sans"
  >
        </TextView>
    </RelativeLayout>
    <TextView
        android:id="@+id/name"
       
 android:layout_width="wrap_content"
       
  android:layout_height="wrap_content"
       
  android:layout_below="@+id/header"
        android:padding="15dp"
        android:text="Name"
       
  android:textColor="@android:color/white"
        android:textSize="16sp"
        android:textStyle="bold"
        android:visibility="invisible"
 />
    <Button
        android:id="@+id/share"
       
  android:layout_width="wrap_content"
       
  android:layout_height="wrap_content"
       
  android:layout_alignParentRight="true"
       
  android:layout_below="@+id/et_share"
        android:layout_marginTop="22dp"
       
  android:background="@drawable/linkedin_share"
        android:visibility="invisible"
  />
    <Button
        android:id="@+id/login"
       
  android:layout_width="wrap_content"

       
  android:layout_height="wrap_content"

       
  android:layout_centerHorizontal="true"
       
  android:layout_centerInParent="true"
       
  android:layout_centerVertical="true"
       
  android:background="@drawable/btn_active_pressed"
       
  android:gravity="center_vertical|center_horizontal"
        android:padding="8dp"
        android:text="Login"
       
  android:textColor="@android:color/white"
        android:textStyle="bold" />
    <ImageView
        android:id="@+id/photo"
        android:layout_width="72dp"
        android:layout_height="72dp"
       
  android:layout_alignRight="@+id/et_share"
       
  android:layout_alignTop="@+id/name"

        android:layout_marginTop="22dp"

       
  android:background="@drawable/photo"

        android:padding="5dp"

        android:visibility="invisible"
  />


    <EditText
        android:id="@+id/et_share"
       
 android:layout_width="match_parent"
        android:layout_height="100dp"
       
  android:layout_alignBottom="@+id/login"
       
  android:layout_alignParentRight="true"
        android:ems="10"
       
  android:gravity="top|center_vertical"
        android:hint="Enter Your Text to
  Share"
        android:visibility="invisible"
  >

        <requestFocus />
    </EditText>
</RelativeLayout>

finally the AndroidManifest.xml file:

5. AndroidManifest.xml

<?xml version="1.0" encoding="utf-8"?>

<manifest
  xmlns:android="http://schemas.android.com/apk/res/android"

    package="com.example.linkedin"

    android:versionCode="1"

    android:versionName="1.0" >


    <uses-sdk

        android:minSdkVersion="8"

        android:targetSdkVersion="16"
  />


    <uses-permission
  android:name="android.permission.INTERNET" />

    <application

        android:allowBackup="true"

       
  android:icon="@drawable/ic_launcher"

       
  android:label="@string/app_name"

        android:theme="@style/AppTheme"
  >

        <activity

           
  android:name="com.example.linkedin.LinkedInSampleActivity"

           
  android:label="@string/app_name" >

           
  <intent-filter>

               
  <action android:name="android.intent.action.MAIN" />


  <category android:name="android.intent.category.LAUNCHER"
  />

           
  </intent-filter>

        </activity>

    </application>


</manifest>

NoteWhile Sending or Posting message on LinkedIn , Or shairing message on
           LinkedIn you found following error to:      


I am obtaining the following error when using the resource client.sendMessage():

com.google.code.linkedinapi.client.LinkedInApiClientException: Throttle limit for calls to this resource is reached.
com.google.code.linkedinapi.client.impl.BaseLinkedInApiClient.createLinkedInApiClientException(BaseLinkedInApiClient.java:3906)
com.google.code.linkedinapi.client.impl.BaseLinkedInApiClient.callApiMethod(BaseLinkedInApiClient.java:3846)
com.google.code.linkedinapi.client.impl.BaseLinkedInApiClient.sendMessage(BaseLinkedInApiClient.java:1829)
org.apache.jsp.linkedin_005fEmail_jsp._jspService(linkedin_005fEmail_jsp.java:149)
org.apache.jasper.runtime.HttpJspBase.service(HttpJspBase.java:70)
javax.servlet.http.HttpServlet.service(HttpServlet.java:803)
org.apache.jasper.servlet.JspServletWrapper.service(JspServletWrapper.java:374)
org.apache.jasper.servlet.JspServlet.serviceJspFile(JspServlet.java:337)
org.apache.jasper.servlet.JspServlet.service(JspServlet.java:266)
javax.servlet.http.HttpServlet.service(HttpServlet.java:803)

This is because on LinkedIn there is a few limits, the number of message you can
share on linkedIn. Check below two links for more knowledge:

1. http://developer.linkedin.com/forum/what-throttle-limit-calls-clientsendmessage
2http://developer.linkedin.com/documents/throttle-limits---see the per day limit

Few Other links
1. http://developer.linkedin.com/documents/libraries-and-tools
2. https://code.google.com/p/linkedin-j/downloads/list


Download the Complete Source Code : LinkedInDemo

Hope this post Helps you.
Enjoy Coding :)


Monday, 6 May 2013

Android Update a ui using BroadcastReceiver | Android BroadcastReceiver Example | Android Service


Hello Friends , Have you thinking about calling the service in your android app.
Trying to start service when you receive some type of notifiaction or need to refresh a view
or activty after getting new data from web service or need to refresh
your activity after every few second of time interval.

Yes , this android article help you a lot. In my case I wanted to refresh my activity silently
whenever I received new data  in my web service response.

For this I used Broadcast receiver and services and things work like charm to me  :)


1.What is Broadcast receiver??
  A broadcast receiver  is an Android component which allows you to register
  for system or application events.

 Let’s start with BroadcastReceiver: Here we will try to refresh our view via
 Android service call.


First of all we need to define private variable in our Activity:
//---------------------------

private BroadcastReceiver broadcastReceiver = new BroadcastReceiver() {
  @Override
   public void onReceive(Context context, Intent intent) {
updateDate(intent);
   }
};

//---------------------------

2.Then we override methods onResume() where our broadcast receiver will be registered
  and also onPause() where will our receiver be unregistered:

//---------------------------
@Override
public void onResume() {
    super.onResume();
    registerReceiver(broadcastReceiver, new IntentFilter(
MyService.BROADCAST_ACTION));
}

@Override
public void onPause() {
super.onPause();
// unregisterReceiver(broadcastReceiver);
}
//---------------------------

3.Now we can start our service (onStart), send a broadcast message and we will show a toast message.
   And also update the UI afeter ever few(7 second) second.

//---------------------------
package com.mukesh.services;

import java.util.Date;

import android.app.Service;
import android.content.Intent;
import android.os.Handler;
import android.os.IBinder;

public class MyService extends Service {
        public static final String BROADCAST_ACTION = "com.mukesh.service";
        private final Handler handler = new Handler();
        Intent intent;
        int counter = 0;

        @Override
        public void onCreate() {
                // Called on service created
                intent = new Intent(BROADCAST_ACTION);
        }

        @Override
        public void onDestroy() {
                // Called on service stopped
                stopService(intent);
        }

        @Override
        public void onStart(Intent intent, int startid) {
                int i = 0;
                while (i <= 2) {
                        if (i > 1) {
                                i++;
                                this.onDestroy();
                        } else {
                                counter = i;
                                i++;
                                handler.removeCallbacks(sendUpdatesToUI);
                                handler.postDelayed(sendUpdatesToUI, 1 * 1000); // 1 sec
                        }

                }

        }

        private Runnable sendUpdatesToUI = new Runnable() {
                public void run() {
                        DisplayLoggingInfo();
                        handler.postDelayed(this, 7 * 1000); // 7 sec
                }
        };

        private void DisplayLoggingInfo() {

                intent.putExtra("time", new Date().toLocaleString());
                intent.putExtra("counter", String.valueOf(counter));
                sendBroadcast(intent);
                stopService(intent);
        }

        public static boolean isRunning() {
                return true;
        }

        @Override
        public IBinder onBind(Intent intent) {
                return null;
        }
}


//---------------------------
4. Don’t forget to add this service declaration in your AndroidManifest.xml in
    order to be set up properly:

//----------------------------

<?xml version="1.0" encoding="utf-8"?>
<manifest xmlns:android="http://schemas.android.com/apk/res/android"
      package="com.examples"
      android:versionCode="1"
      android:versionName="1.0">
    <application android:icon="@drawable/icon" android:label="@string/app_name">
        <activity android:name=".SimpleCalendarViewActivity"
                  android:label="@string/app_name">
            <intent-filter>
                <action android:name="android.intent.action.MAIN" />
                <category android:name="android.intent.category.LAUNCHER" />
            </intent-filter>
        </activity>
    </application>
</manifest>

//----------------------------


Download Source code:
Android Service Demo


Enjoy Coding :)

Friday, 12 April 2013

Dynamic Swipe View Example In Android | Android Custom Swipe view


Hello Friends,

Have you searching  for dynamic swipe view on list view Item ??
Actually my need is to display the list view item one by one on swiping it from left
to right or right to left.

In my application my need is to show an listview items i.e an profile image(Imageview), a
TextView fortitle , another ImageView and a textview which contains some description.
This items swipe left to right and right to left based on the size of listview.

We can do this in two ways:
    1. Using Android View flipper : By using view flipper first we have  to make the
        complete xml programatically using java, because we don't know the exact size
        of ListView . So showing the item on by one we need to make the xml in our java
        code, which is toughest job.

   2. Using Android GestureListener :    I am using this one because in this there is
       no need to make the in your code. We just need to bind the view on left and right
       gesture.

 Today , I am going to share my complete source code for dynamic swipe view in
 android. Using this we can display the details of list view item on swipe.

dynamic swipe view
swipe gesture


Code:

1.actvity_main.xml

<?xml version="1.0" encoding="utf-8"?>

<RelativeLayout xmlns:android="http://schemas.android.com/apk/res/android"
    android:id="@+id/ll"
    android:layout_width="fill_parent"
    android:layout_height="fill_parent"
    android:background="@android:color/background_dark"
    android:orientation="vertical" >

    <RelativeLayout
        android:id="@+id/tabBar"
        android:layout_width="fill_parent"
        android:layout_height="wrap_content"
        android:background="@drawable/blue_gradient_header"
        android:orientation="horizontal" >

        <TextView
            android:id="@+id/txtTitle"
            android:layout_width="wrap_content"
            android:layout_height="32dp"
            android:layout_centerHorizontal="true"
            android:layout_centerVertical="true"
            android:text="Dynamic swipe View"
            android:textColor="@android:color/white"
            android:textSize="22sp"
            android:textStyle="bold"
            android:typeface="sans" >
        </TextView>
    </RelativeLayout>

    <RelativeLayout
        android:id="@+id/content"
        android:layout_width="match_parent"
        android:layout_height="match_parent"
        android:layout_below="@+id/tabBar" >

        <TextView
            android:id="@+id/text"
            android:layout_width="fill_parent"
            android:layout_height="wrap_content"
            android:layout_alignBottom="@+id/image"
            android:layout_alignParentTop="true"
            android:layout_toRightOf="@+id/image"
            android:background="#AAff0000"
            android:padding="10dp"
            android:text="Mukesh"
            android:textSize="16sp"
            android:textStyle="bold" />

        <ImageView
            android:id="@+id/image"
            android:layout_width="50dp"
            android:layout_height="50dp"
            android:layout_alignParentLeft="true"
            android:layout_alignParentTop="true"
            android:layout_marginLeft="14dp"
            android:background="@drawable/mukesh"
            android:padding="5dp"
            android:scaleType="fitXY" />

        <ImageView
            android:id="@+id/imageView1"
            android:layout_width="match_parent"
            android:layout_height="200dp"
            android:layout_alignLeft="@+id/image"
            android:layout_below="@+id/image"
            android:layout_marginBottom="30dp"
            android:layout_marginTop="10dp" />

        <TextView
            android:id="@+id/desc"
            android:layout_width="match_parent"
            android:layout_height="wrap_content"
            android:layout_below="@+id/imageView1"
            android:layout_marginLeft="10dp"
            android:layout_marginRight="10dp"
            android:layout_marginTop="10dp"
            android:padding="8dp"
            android:text="Hello ! this is an Sample code.My need is to show listview Item on swipe, one by one.For this I am using gessture listner and Fling animation."
            android:textSize="14sp"
            android:textStyle="bold" />
    </RelativeLayout>

</RelativeLayout>


2.MainActivity.Java

package com.example.fling;

import android.app.Activity;
import android.graphics.Color;
import android.os.Bundle;
import android.view.GestureDetector;
import android.view.MotionEvent;
import android.view.GestureDetector.OnGestureListener;
import android.view.animation.Animation;
import android.view.animation.AnimationUtils;
import android.widget.ImageView;
import android.widget.LinearLayout;
import android.widget.RelativeLayout;
import android.widget.TextView;
import android.widget.Toast;
import android.widget.ViewFlipper;

public class MainActivity extends Activity implements OnGestureListener {
 protected GestureDetector gestureScanner;
 protected ViewFlipper vf;
 private static final int SWIPE_MIN_DISTANCE = 120;
 private static final int SWIPE_MAX_OFF_PATH = 250;
 private static final int SWIPE_THRESHOLD_VELOCITY = 200;
 TextView tv;
 String[] name = { "Mukesh", "Hitesh", "Rohit", "Arshad" };
 int[] color = { Color.BLUE, Color.RED, Color.CYAN, Color.GREEN };
 int[] background = { Color.RED, Color.CYAN, Color.MAGENTA, Color.BLUE };
 int[] d = { R.drawable.mukesh, R.drawable.image_1, R.drawable.image_2,
   R.drawable.image_3 };
 int pos = 0;
 @SuppressWarnings("unused")
 private Animation slideLeftIn;
 private Animation slideLeftOut;
 private Animation slideRightIn;
 private Animation slideRightOut;
 RelativeLayout ll;
 ImageView image;
 ImageView profilePic;

 @Override
 public void onCreate(Bundle savedInstanceState) {

  super.onCreate(savedInstanceState);
  gestureScanner = new GestureDetector(this);
  setContentView(R.layout.activity_main);
  ll = (RelativeLayout) findViewById(R.id.ll);
  tv = (TextView) findViewById(R.id.text);
  image = (ImageView) findViewById(R.id.imageView1);
  profilePic = (ImageView) findViewById(R.id.image);
  setText(pos);
  slideLeftIn = AnimationUtils.loadAnimation(this, R.anim.slide_in_left);
  slideLeftOut = AnimationUtils
    .loadAnimation(this, R.anim.slide_out_left);
  slideRightIn = AnimationUtils
    .loadAnimation(this, R.anim.slide_in_right);
  slideRightOut = AnimationUtils.loadAnimation(this,
    R.anim.slide_out_right);
 }

 @Override
 public boolean onTouchEvent(MotionEvent me) {
  return gestureScanner.onTouchEvent(me);
 }

 public boolean onDown(MotionEvent e) {
  return true;
 }

 public boolean onFling(MotionEvent e1, MotionEvent e2, float velocityX,
   float velocityY) {
  try {
   if (e1.getX() > e2.getX()
     && Math.abs(e1.getX() - e2.getX()) > SWIPE_MIN_DISTANCE
     && Math.abs(velocityX) > SWIPE_THRESHOLD_VELOCITY) {
    Toast.makeText(this.getApplicationContext(), "Left",
      Toast.LENGTH_SHORT).show();
    // vf.showPrevious();
    ll.setAnimation(slideLeftIn);
    ll.setAnimation(slideLeftOut);

    pos++;
    if (pos == 0) {
     setText(pos);
    } else {

     setText(pos);
    }

   } else if (e1.getX() < e2.getX()
     && e2.getX() - e1.getX() > SWIPE_MIN_DISTANCE
     && Math.abs(velocityX) > SWIPE_THRESHOLD_VELOCITY) {
    Toast.makeText(this.getApplicationContext(), "Right",
      Toast.LENGTH_SHORT).show();
    // vf.showNext();
    pos--;
    ll.setAnimation(slideRightIn);
    ll.setAnimation(slideRightOut);
    if (pos == 0) {
     setText(pos);
    } else {

     setText(pos);
    }
   }
  } catch (Exception e) {
   // nothing
  }
  return true;

 }

 public void onLongPress(MotionEvent e) {
 }

 public boolean onScroll(MotionEvent e1, MotionEvent e2, float distanceX,
   float distanceY) {
  return true;
 }

 public void onShowPress(MotionEvent e) {
 }

 public boolean onSingleTapUp(MotionEvent e) {
  return true;
 }

 private void setText(int position) {
  tv.setText(name[position]);
  tv.setTextColor(color[position]);
  tv.setBackgroundColor(background[pos]);
  image.setBackgroundResource(d[pos]);
  profilePic.setBackgroundResource(d[pos]);
 }
}


Now , I added Anim folder under the res folder. This helps me in animating my view
from left to right and right to left.

1. res/anim/slide_in_left.xml:


<?xml version="1.0" encoding="utf-8"?>

<set xmlns:android="http://schemas.android.com/apk/res/android" >

    <translate
        android:duration="500"
        android:fromXDelta="-50%p"
        android:toXDelta="0" />

    <alpha

        android:duration="500"
        android:fromAlpha="0.0"
        android:toAlpha="1.0" />

</set>

2. res/anim/slide_in_right.xml:

   
<set xmlns:android="http://schemas.android.com/apk/res/android" >

    <translate

        android:duration="500"

        android:fromXDelta="50%p"

        android:toXDelta="0" />


    <alpha

        android:duration="500"

        android:fromAlpha="0.0"

        android:toAlpha="1.0" />


</set>

3. res/anim/slide_out_left.xml:
   
   <set xmlns:android="http://schemas.android.com/apk/res/android" >

    <translate
        android:duration="500"
        android:fromXDelta="0"
        android:toXDelta="-50%p" />

    <alpha
        android:duration="500"
        android:fromAlpha="1.0"
        android:toAlpha="0.0" />

  </set>

4.res/anim/slide_out_right.xml:

  <set xmlns:android="http://schemas.android.com/apk/res/android" >

    <translate
        android:duration="500"
        android:fromXDelta="0"
        android:toXDelta="-50%p" />

    <alpha
        android:duration="500"
        android:fromAlpha="1.0"
        android:toAlpha="0.0" />

 </set>
            
      
Download the code: DynamicSwipeView


Cheers :)
Enjoy Coding.... :)

Sunday, 7 April 2013

Facebook like slide-in and slide out navifation | Android Slide Navigation


Hello Friends,

Today , I am going to share you my code with the help of which you
can show facebook like slide navigation in your android.

If you are searching for facebook like slide in slide out navigation 
view, or trying to implement facebook like page navigation in your 
android application , then this tutorial definitely helps you. 

facebook slide
android navigation                                               


android slide navigartion
facebook


Download the complete source code here

Enjoy Coding..... :)
Cheers...


Sunday, 31 March 2013

Roboelectric : AndroidManifest.xml not found or not a file

Hello Friends,

While Running my first android Test Project, I found                                                            
                                                                                                               
the following error:        
                                                                                                                            
java.lang.RuntimeException: java.lang.RuntimeException: D:\workspace\MyProjectTest\.\AndroidManifest.xml not found or not a file; it should point to your project's AndroidManifest.xml
at org.robolectric.RobolectricTestRunner.methodBlock(RobolectricTestRunner.java:95)
at org.junit.runners.BlockJUnit4ClassRunner.runNotIgnored(BlockJUnit4ClassRunner.java:79)
at org.junit.runners.BlockJUnit4ClassRunner.runChild(BlockJUnit4ClassRunner.java:71)
at org.junit.runners.BlockJUnit4ClassRunner.runChild(BlockJUnit4ClassRunner.java:49)
at org.junit.runners.ParentRunner$3.run(ParentRunner.java:193)
at org.junit.runners.ParentRunner$1.schedule(ParentRunner.java:52)
at org.junit.runners.ParentRunner.runChildren(ParentRunner.java:191)
at org.junit.runners.ParentRunner.access$000(ParentRunner.java:42)
at org.junit.runners.ParentRunner$2.evaluate(ParentRunner.java:184)
at org.junit.runners.ParentRunner.run(ParentRunner.java:236)
at org.eclipse.jdt.internal.junit4.runner.JUnit4TestReference.run(JUnit4TestReference.java:50)
at org.eclipse.jdt.internal.junit.runner.TestExecution.run(TestExecution.java:38)
at org.eclipse.jdt.internal.junit.runner.RemoteTestRunner.runTests(RemoteTestRunner.java:467)
at org.eclipse.jdt.internal.junit.runner.RemoteTestRunner.runTests(RemoteTestRunner.java:683)
at org.eclipse.jdt.internal.junit.runner.RemoteTestRunner.run(RemoteTestRunner.java:390)
at org.eclipse.jdt.internal.junit.runner.RemoteTestRunner.main(RemoteTestRunner.java:197)
Caused by: java.lang.RuntimeException: D:\workspace\MyProjectTest\.\AndroidManifest.xml not found or not a file; it should point to your project's AndroidManifest.xml
at org.robolectric.AndroidManifest.validate(AndroidManifest.java:85)
at org.robolectric.AndroidManifest.getResourcePath(AndroidManifest.java:232)
at org.robolectric.RobolectricContext.getSystemResourcePath(RobolectricContext.java:104)
at org.robolectric.RobolectricTestRunner.setupApplicationState(RobolectricTestRunner.java:181)
at org.robolectric.RobolectricTestRunner.internalBeforeTest(RobolectricTestRunner.java:134)
at org.robolectric.RobolectricTestRunner.methodBlock(RobolectricTestRunner.java:92)
... 15 more

After spending several hours I found the fixed. Actually I am doing a silly mistake during configuring
the test environment.Just forgot to add the project reference , due to this my test project could not
find the Androidmanifest.xml file.

Go to argument tab under junit test run configuration and select the second radio buttoni.e Other and browse and select you android project.

All done now run your project.

Enjoy coding... :)
Cheers :)


Friday, 22 March 2013

Android Unit Testing With Robolectric | Android TDD | Android Unit Test Case

Hello Droid Guys,
           This is my first android Hello World test project using Roboelectric.
This tutoial covers  following testing topic.
                                                                                 

1. How to test text on a TextView using Roboelectric in Android.                          
2. How to test image on a ImageView using Roboelectric in Android
3. How to test New Activity call using Roboelectric in Android
4. Testing Button is visible or not in Android using Roboelectric
5. Test case for button click in android using Roboelectric
5. How to check intent using Roboelectric in Android
6. How to make API call using Roboelectric in Android
7. Calling HTTP request in Android Roboelectric test project

Before starting writing the above listed test case , If you are thinking about how to setup
your First android test project , then see the Robolectric Setup  tutorial .

First of all I am going to create an android Project "RoboElectric" .

Here is my Android Code:

1. MainActivity.java :
package com.example.roboelectric;

import android.os.Bundle;
import android.app.Activity;
import android.content.Intent;
import android.view.Menu;
import android.view.View;
import android.view.View.OnClickListener;
import android.widget.Button;
import android.widget.EditText;

public class MainActivity extends Activity {

 Button login;
 EditText name;
 EditText password;

 @Override
 public void onCreate(Bundle savedInstanceState) {
  super.onCreate(savedInstanceState);
  setContentView(R.layout.activity_main);

  login = (Button) findViewById(R.id.login);
  name = (EditText) findViewById(R.id.name);
  password = (EditText) findViewById(R.id.password);

  login.setOnClickListener(new OnClickListener() {

   @Override
   public void onClick(View v) {
    Intent home = new Intent(MainActivity.this, Home.class);
    startActivity(home);
   }
  });

 }

 @Override
 public boolean onCreateOptionsMenu(Menu menu) {
  // Inflate the menu; this adds items to the action bar if it is present.
  getMenuInflater().inflate(R.menu.activity_main, menu);
  return true;
 }

}
2. Home.java
package com.example.roboelectric;

import android.os.Bundle;
import android.app.Activity;
import android.view.Menu;

public class Home extends Activity {

 @Override
 protected void onCreate(Bundle savedInstanceState) {
  super.onCreate(savedInstanceState);
  setContentView(R.layout.activity_home);
 }

 @Override
 public boolean onCreateOptionsMenu(Menu menu) {
  // Inflate the menu; this adds items to the action bar if it is present.
  getMenuInflater().inflate(R.menu.activity_home, menu);
  return true;
 }

}
3. Second.java
package com.example.roboelectric;

import android.os.Bundle;
import android.app.Activity;
import android.view.Menu;

public class Home extends Activity {

 @Override
 protected void onCreate(Bundle savedInstanceState) {
  super.onCreate(savedInstanceState);
  setContentView(R.layout.activity_home);
 }

 @Override
 public boolean onCreateOptionsMenu(Menu menu) {
  // Inflate the menu; this adds items to the action bar if it is present.
  getMenuInflater().inflate(R.menu.activity_home, menu);
  return true;
 }

}
4. AndroidManifest.xml
<manifest xmlns:android="http://schemas.android.com/apk/res/android"
    package="com.example.roboelectric"
    android:versioncode="1"
    android:versionname="1.0" >

  <uses-sdk
        android:minsdkversion="8"
        android:targetsdkversion="16" >

        <application
            android:allowbackup="true"
            android:icon="@drawable/ic_launcher"
            android:label="@string/app_name"
            android:theme="@style/AppTheme" >

            <activity
                android:name="com.example.roboelectric.MainActivity"
                android:label="@string/app_name" >
                <intent-filter>
                  <action android:name="android.intent.action.MAIN" >
                     <category android:name="android.intent.category.LAUNCHER" >
                     </category>
                   </action>
                </intent-filter>
            </activity>
            <activity
                android:name="com.example.roboelectric.Home"
                android:label="@string/title_activity_home" >
            </activity>
          <activity
                android:name="com.example.roboelectric.Second"
                android:label="@string/title_activity_second" >
            </activity>
        </application>
  </uses-sdk>
</manifest>

What Are the expected test case for above android project ?? 

 1. checking hello world text
 2. login button is visible or not
 3. test startActivity() starts a new activity or not on click of login button '
 Now, I am Going to write my test Project "RoboElectricTest"

1.MyActivityTest.java
import java.io.IOException;

import org.robolectric.Robolectric;
import org.robolectric.RobolectricTestRunner;
import org.robolectric.matchers.StartedMatcher;
import org.junit.Before;
import org.junit.Test;
import org.junit.runner.RunWith;

import android.util.Log;
import android.view.View;
import android.widget.Button;

import com.example.roboelectric.Home;
import com.example.roboelectric.MainActivity;
import com.example.roboelectric.R;
import com.example.roboelectric.Second;

import static org.hamcrest.CoreMatchers.equalTo;
import static org.junit.Assert.assertThat;

@RunWith(RobolectricTestRunner.class)
public class MyActivityTest {

 private MainActivity activity;
 private Button login;
 
 @Before
 public void setUp() throws Exception {
   activity = new MainActivity();
   activity.onCreate(null);
   login = (Button) activity.findViewById(R.id.login);
 }
 
  // checking hello world text
 @Test 
 public void shouldHaveHappySmiles() throws Exception {
  String hello = new MainActivity().getResources().getString( R.string.hello_world);
  assertThat(hello, equalTo("Hello world!"));
 }   
 // Button visible 
 @Test 
 public void testButtonsVisible() { 
  assertThat(login.getVisibility(), equalTo(View.VISIBLE)); 
 } 
 
 // startnew activty 
 @Test 
 public void shouldStartNextActivityWhenButtonIsClicked() { 
  login.performClick();
  assertThat(activity, new StartedMatcher(Home.class));
  }
}


Hope this will helps you ,in writing UI test case for your android project using Roboelectric .

Enjoy Coding. Cheers...... :)

Tuesday, 19 March 2013

Steps to configure RoboElectric with Eclipse | Roboelectric | Test Driven Development


Roboelectric Setup with eclipse: 
                      Hello Droid Guys, have you thinking of  Test Driven Development

in Android  using Roboelectric and Mockito??    
                                                                                                                                                                                                                   
Today , I am going explain some easy steps for configuring the test environment for your android project in eclipse. How to configure Robolectric test framework with eclipse.

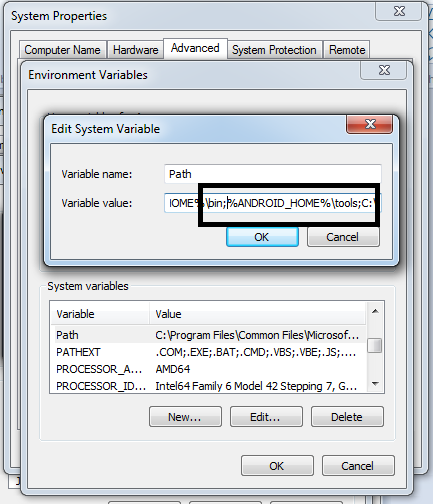
Note: Please add android sdk in your system envoirnment variable path


Step 1: Create an Android Project:
    1. File-->New-->Project-->Android-->Android Project-->Next
    2. New Android Project Dialog will open Name Your porject as
        "RoboElectric"
    3. Package Name "com.example"
    4. Create an Activity Class "MainActivity"
    5.  Click Next and follow Instruction

Step 2: Adding a Source test directory in your android Project
    1. Right click on "RoboElectric" android project in project explorer and create a new
        Folder "test" and click Finish . See below snap for more help:


Step 3: Creating an Java test Project
    1. File-->New-->Java Project
    2. Name the Project as "RoboElectricTest" and click Next


    3. Expand the RoboElectricTest and Seclect "src"
    4. Click  Remove source folder 'src' from build path. See below snap for
         more help


     5. Click on  "Link additional source" and browse to "/Roboelectric/test" and then Click
         Finish. See below snap for help


            Step 4: Adding dependency on the Android Project
               1. Right Click on "RoboelectricTest" Project-->Build Path -->Select Project Tab
               2. Click Add-->select "Roboelectric" project Finish. See below snap:

         
     Step 5: Configuring the build path of "RoboElectricTest" Project:
        1.Go to project build path then select Library tab
        2. Click Add Library-->select Junit--> Next
             Note: Choose Junit 4 because RoboElectric is not Compatible with Junit3
       3. Click Finish.
       4. Click on "Add external Jar and Add roboelectric.jar. You can download it from
            here.
       5.  Click on "Add external Jar and navigate to your android sdk folder and select android.jar
       6.   Click on "Add external Jar and navigate to your android sdk folder and select map.jar


             Step 6: Now the final steps: i.e Creating eclipse Junit run configuration
1                  1. Right Click on "RoboElectric" project go to "Run"-->"Run Configuration"
                    2. Double click on "Junit"  from left menu (Not to click "Android Junit Test")
                    3. Name as RoboElectricTestConfiguration
                    4. Select the "Run all tests in the selected project,package or source folder option
                    5. Click search button
                    6. Select "RoboElectrictest"
                    7. TestRunner: Junit4
                                         
                    Note: Choose Junit 4 because RoboElectric is not Compatible with Junit3
                    8. Select eclipse Junit launcher and click Ok

                                               
                    9. Click the argument Tab from the top
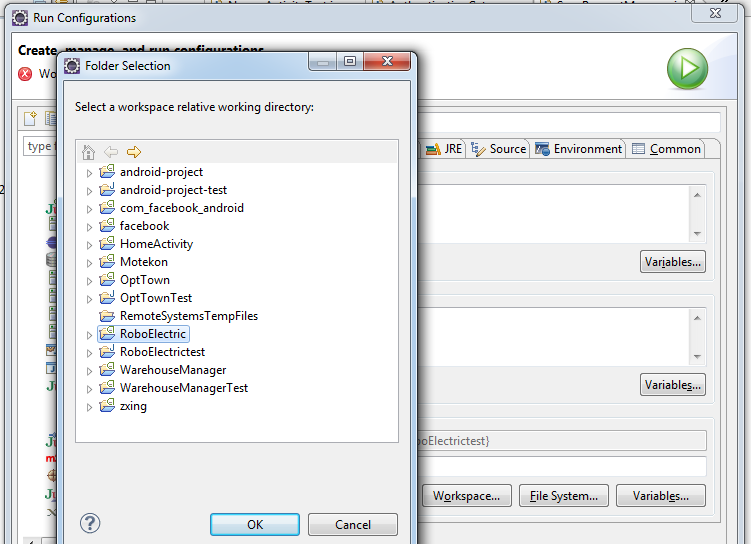
                  10 . Under "Working directory" select the other radio button

                                             
                  11. Click Worksapce, select "RoboElectric"(not the RoboelectricTest and the value inside
                         the "Other" edit box should look like '${workspace_loc:Roboelectric}')

                                      
                  12. Click Ok and close.


                The Roboelectric TDD environment is now configure. Now Android Unit Testing
                Envoirnment With Robolectric will be Done

                In my next blog I will share with you a sample code , which test our first android project
                Hello World , Using Roboelectric.


                Enjoy Coding :)  

                You May ALSO LIKE THIS:
                1. Android TextView testing
                2. Android Button click testing
                3. Android startActivity() or launch new activity test


Copyright @ 2013 Android Developers Blog.